Thursday, 29 November 2018

MMS 504 - FILM & TELEVISION – THEORY & PRACTICE


1. Introduction to Asian Cinema –


Japan

China
  • Last Emperor (Qing dynasty 1644–1911) 
  • The Republic of China (1912 - 1949)
    • KMT, CPC & Chinese Civil War (1927 - 1949)
    • Sino-Japanese War (1937 - 1945)

  • People's Republic of China (1949 - 
    • 1949–1976 Mao era
      • Chinese Communist Revolution (1946-49)
      • Constitution of PRC
      • Hundred Flowers Campaign (1956-57)
      • Anti-Rightist Campaign (1957-59) purge rightist
      • Cultural Revolution (1966-76) 
  • Republic of China (Taiwan) (1949–present)

Cinema of Hong Kong


Bruce Li is famous actor of  <Hong Kong Cinema>

first Hong Kong feature film is usually given to 
√) Zhuangzi Tests His Wife (1913) 

The True Story of Wong Fei Hung 1949 (folk hero) 

Popularity of Hong Kong Cinema 
  • Transcultural appeal.
    • Hollywood action film elements,
    • Chinese storytelling,
    • aesthetic traditions
    • filmmaking techniques 
  • wuxia style, emphasizing mysticism and swordplay
  • Emergence of HongKong Martial art films 

2. Introduction to the cinemas of the developing countries-


Iran & Middle East 

Latin American cinema 


Cinema of Africa


    - Colonization    &   Decolonization
    - Post Colonial Cinema

African Independence 


  • La Noire de... (Black Girl) in 1966 searing account of the isolation of a young black domestic servant

  • Mandabi 1968 (The Money Order) effects of post-colonial Africa on the lives of ordinary peoplE

  • Emitai (1971) French military conscription in Senegal (colonialism)

  • Xala (1974) Senegalese curse, to render a smug westernised black bourgeois businessman impotent on the day of his wedding to his third wife (capitalism)

  • Ceddo (1976) a confrontation between African traditions and Christian and Muslim attempts to impose themselves (religion)
  • Camp de Thiaroye (1988) French army attacks the transit camp (waiting for demobilisation) with tanks, leaving few Senegalese soldiers alive. (colonialism)

  • Guelwaar (1992) a radical Catholic priest is erroneously buried in a Muslim cemetery and mayhem inevitably follows.

  • L'Héroïsme au Quotidien (1999) the heroism of African women (patriarchy)

  • Faat Kiné (2000) a single mother with two children and two ex-husbands

  • Moolaadé (2002) condemnation of female circumcision


3. Regular screening of the films related to their everyday study, maintaining ‘film diary’ and making critical

Judgement of those films.

Suggested Book List:

1.Oxford History of World Cinema, OUP
2.How to read a film,James Monaco
3.The Oxford guide to film studies

Sunday, 11 November 2018

Video Camera Functions

Camera Work - Beginner Level
A 6-page introductory tutorial suitable for the absolute beginner.
Shots & Framing
A guide to the standard shot types.
Focus
How to use the manual focus, plus information about back-focus, depth of field, etc.
Iris & Exposure
How to use the manual iris to set the correct exposure.
Shutter
How and when to use the shutter.
Zoom
Tips on effective zooming, and alternative ways to get the same effect.
White Balance
How to perform a white balance to set the correct colours.
Tripods
How to choose the correct tripod and use it effectively.
Viewfinders
How to set up and use a camera viewfinder correctly.
Filters
Quick guide to common filter types and functions.

Choosing SD Cards

That little SD card - or Secure Digital card if you want to use its full name - has provided us with the de facto means of portable storage for a very long time. Dating all the way back to 1999 in fact. In that time, it's fought off plenty of competition, but still sets the standard when it comes to expandable storage.

Nowadays, you'll find SD cards come in all manner of different shapes and sizes, and can be slotted into plenty of devices from cameras, smartphones and handheld games consoles like Nintendo's Switch. The world of SD cards can be a confusing one, with different speed ratings, sizes and capacities. Buy SD cards can be tricky, but with the right know-how, you'll be able to pick out the right SD card that suits your needs. Here's how to choose an SD card.


What SD card types are there?


SD, SDHC and SDXC


As SD cards have begun to physically shrink down in size over the years, the SD card can be considered the ‘full-size’ variant. It’s typically what is used in most modern digital cameras and nearly all laptops will come equipped with an SD card reader slot.

SDHC - ‘Secure Digital High Capacity’. This was initially introduced to cover SD cards with a capacity above 2GB and below 32GB. 

SDXC - ‘Secure Digital eXtra Capacity’, which go far beyond 32GB in size. You can buy SDXC cards with a whopping 2TB of storage.

SD, SDHC and SDXC all physically look the same, therefore they’ll all fit in a regular SD card slot. Problems might arise depending on the device you’re looking to use them in. Older devices that pre-date SDXC’s introduction might therefore not be compatible, so be sure to check your product’s specifications. Devices are backwards compatible, so an SDXC-compatible device can use SDHC and SD cards. An SDHC-compatible device can use SDHC and SD cards, but will not be able to use SDXC cards.

MiniSD and MiniSDHC

The MiniSD was the first miniaturisation of the SD card and is around half the height of the original SD card. You can also find miniSDHC cards, which expanded storage to 4GB. Again, you’ll need to make sure your device specifically supports miniSDHC rather than just miniSD. The miniSD card never gained much traction, however, so devices that use it are relatively uncommon. Often, miniSD cards will come with an adaptor that can convert it into a full-size SD card, which makes it easier to use with laptop card readers.

MicroSD, MicroSDHC and MicroSDXC

The microSD is the smallest version. You might have also seen it referred to as TransFlash or abbreviated as a TF card. MicroSD cards, as the name implies, are physically tiny and came about predominantly to be used in smartphones that would benefit from a much smaller card.

Like the full-size SD card, there are also microSDHC and microSDXC variants that expanded the storage beyond the initial limitations. Right now, the largest microSDXC available is 128GB, which isn’t as much as the largest SDXC card but then you’re limited by the physical size of the card. When buying a microSD, microSDHC or microSDXC card you’ll usually get a full-size SD card adaptor as well. Again, SDXC-compatible devices will be backwards compatible with microSDHC and microSD cards, and microSD cards can be used in microSDHC devices.


SD card speed classes explained

The next area of confusion is around speed classes. These are how different SD, miniSD and microSD cards are rated in terms of read and write speeds. These are important particularly when the cards are used in camcorders or action cameras as the speed of the card will limit the video resolution and bit rate you’re able to record. High-resolution and high bit rate video requires a lot of data to be written to the card very quickly. stills cameras with high resolutions and fast burst shooting will also take modern cards to their limits.


The SD Association devised a way to standardise the speed ratings for different cards. These are defined as ‘Speed Class’ and refer to the absolute minimum sustained write speeds.

Cards can be rated as

Class 2 (minimum write speed of 2MB/s),
Class 4 (4MB/s)
Class 6 (6MB/s)
Class 10 (10MB/s)

It’s important to note that these are the minimum, so it’s entirely possible a card can achieve faster speeds but these give you an impression of the least you can expect.

Many SD card manufacturers will also list a specific speed alongside the Class rating. This means a card can be Class 10 but also be listed as ‘up to 80MB/s’. The wording is important, as that’s the best you can expect but not necessarily what you’ll always achieve. You might also see a description such as ‘533x’. This refers to a multiplication of the speed of an old CD-ROM (150KB/s). So in this case 533 x 0.15 = 80MB/s (as there are 1,000KB in a MB). On any type of SD card, the Class rating is denoted by a number inside of a C symbol.


UHS Speed Class

The next rating is the UHS Speed Class. This stands for Ultra High Speed and refers to minimum sustained writing performance for recording video. UHS came about due to 4K-capable video devices needing faster write speeds.

The SD Association has two UHS Speed Classes, UHS Speed Class 1 and UHS Speed Class 3. UHS Speed Class 1 supports a minimum 10MB/s write speed, whereas UHS Speed Class 3 supports at least 30MB/s write speed. The UHS Speed Class is denoted by either a 1 or 3 inside of a bucket U symbol. As a rule of thumb, 4K-capable camcorders will usually require at least a U3 rated SD card.

UHS Bus Speed

Things get a little more confusing as UHS Speed Class-rated devices will also use one of two UHS Bus Interfaces that indicates the theoretical maximum read and write speeds. They’ll be listed as either UHS-I or UHS-II to show which interface is used.

UHS-I devices have a maximum read speed of 104MB/s, whereas a
UHS-II card has a maximum read speed of 312MB/s.
Note, that unlike the UHS Speed Class, these are not sustained speeds.

It might sound obvious, but the safest way to make sure you buy the correct card is to first consult your product's user guide or specifications, at least to be sure if your device takes full-size SD or microSD cards. Checking before you buy an SD card is particularly important if your device has specific requirements, such as many 4K camcorders. These will usually explicitly state what type of memory card is required in order to record at the top resolution or bit rate. The Sony FDR-X1000V action camera, for example, clearly states that it needs a Class 10 U3 microSD card in order to record in 4K.

If you're not recording in 4K, the speed might not be so important. A faster-rated card will still be useful if you're using the card to expand the storage in a smartphone or laptop, as a faster read and write speed will make it more responsive. Faster cards in a still image camera will also mean being able to take more or faster photos in burst mode, as these can be written to the card far quicker. Class 10 cards are usually not much more expensive so it's worth paying the extra.

Saturday, 10 November 2018

DSLR Cameras, buttons, terms etc

–Introduction to Camera Basics

Introduction
Overview the cameras 


–Using the Camera

Powering Camera  
Storage
Turning on the Camera
LCD Screen
LCD features
Viewfinder
Recording
Lens
Lens hood
Exposure
Filters
Focus
Zooming
Audio
Framing a shot
Transfering Footage 

–stabilising the camera

Tripod
Handheld 


Comparison of Digital_SLRs (DSLRs) 

What does this button do?


Nikon D5600 Camera TOP VIEW
Nikon D5600 Camera SIDE VIEW


Nikon D5600 Camera BACK of the CAMERA


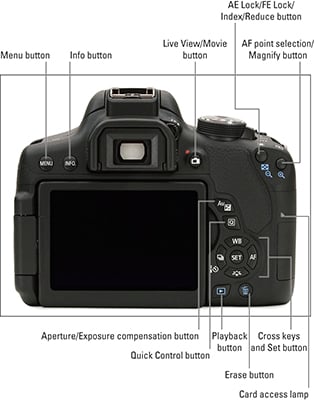
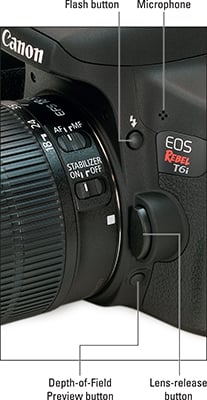
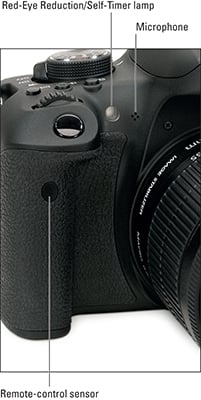
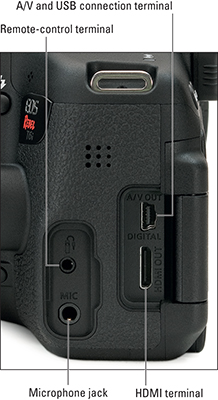
KNOW YOUR CANON CAMERA


Back view of the Canon EOS Rebel T6i/750D camera
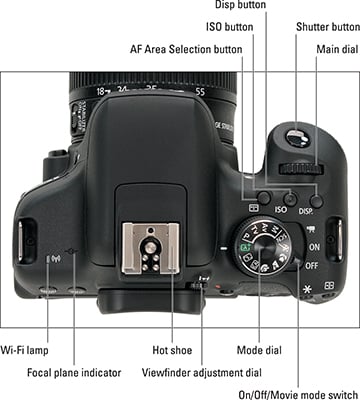
Top view of the Canon EOS Rebel T6i/750D camera


Cheat Sheet


Canon Camera


Aperture Priority (AV)

Allows you to set the aperture of the lens and the camera will select the correct shutter speed. Shoot in this mode if you want more control over the depth of field (DOF) in your images. Note: An aperture of f/2.8 will have very little DOF, but a lot of bokeh (blurred background), while f/16 will have a much greater DOF and much more of your image in focus.

Shutter Priority (TV)

Allows you to set the shutter speed and the camera will select the correct aperture. Shoot in this mode in situations where you need control of the shutter speed, such as sports, wildlife or children. Most DSLR cameras have a range from 30 second exposure to about 8000th of a second (or faster).

Manual

Allows you to be in COMPLETE CONTROL. The cameras metering system can guide you, but you decide the shutter speed and aperture manually. By the end of the summer, we hope you will be shooting in manual mode.


TOP VIEW
  • Shutter Button. We talked about this one in the first section. 
  • Main Dial. Use this dial to change shutter speed or aperture settings.
  • ISO Speed Set Button. Set the ISO speed (image sensor’s sensitivity to light) to suit the ambient light level. If you don’t change it, the ISO speed is set automatically. 100 ISO is standard sensitivity and will produce clear images with very fine amounts of grain. 1600 or 3200 ISO on the sensor is highly sensitive, meaning you can shoot well in low light conditions without a flash, but you lose quality and images will appear more grainy. We’ll talk more about ISO in a future article.
  • On/Off Switch. Switches the camera power on and off. If you leave your camera ON, the sleep mode will kick in after a few minutes and you can turn the power on quickly and instantly by pressing the shutter button.
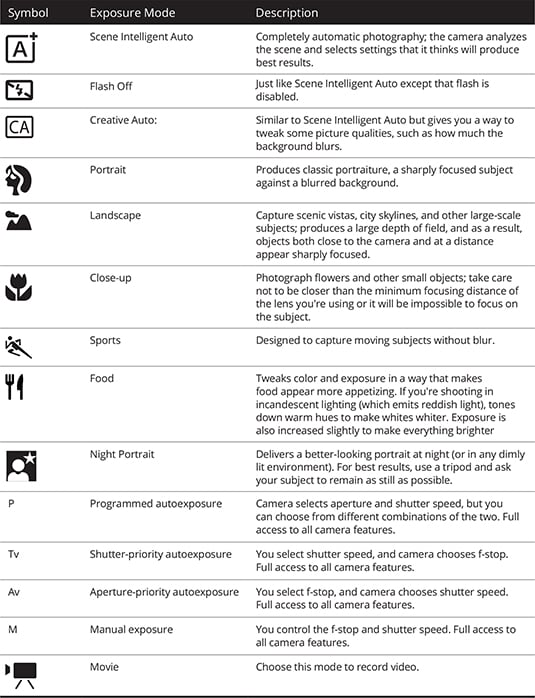
  • Mode Dial. The Mode Dial has the Basic Zone modes and Creative Zone modes. The Creative Zone gives you more control over the result: Program Mode, Shutter-Priority, Aperture-Priority, Manual Exposure and Automatic Depth-of-Field. In the Basic Zone (often seen on point and shoot cameras), all you have to do is press the shutter button and the camera does the rest. These settings include: Portrait, Landscape, Close-ups, Sports, Night Portraits and Flash Off modes.
  • Hotshoe. The area where you can place an external, dedicated speedlite or other flash drive.
  • Lens Auto Focus/Manual Focus Switch. It’s worth mentioning that almost all lenses have an auto/manual focus switch in this position.
  • Back of Camera 
  • Viewfinder. Unlike your old point and shoot camera, you actually have to look into the viewfinder to see what you are shooting. Some DSLR models include a live LCD screen (or a flip-out screen), but it’s just as easy to look through the viewfinder. When you look inside, you’ll be able to see your focal points, your histogram, ISO, aperture and shutter speed settings (all of which we’ll talk about in future articles).
  • Dioptric AdjustmentTucked in behind the rubber eyecup, the small dioptric adjustment dial is easily overlooked. Dioptric adjustment allows for fine-tuning of the viewfinder focus to meet an individual’s eyes. If adjusted correctly, a person who normally wears glasses or contacts, wouldn’t need to while using their camera. 
  • Rubber Eyecup. If you wear glasses, the rubber eyecup protects the lenses from scratching against the camera. Without glasses, it allows the viewfinder to form around your eye and eliminate any surrounding glare.
  • Exposure Lock/Zoom Button. This button serves 2 purposes. A) Exposure Lock Button: aim the camera at your subject and press this button. It will record and keep (for a few seconds) that exact exposure while you recompose and shoot. It doesn’t work once you manually adjust your settings, but you’re probably shooting in auto mode right now, so it might still be useful for you. B) When using the image preview screen to look at your exposed images, this button will zoom in on a specific area.
  • Focus Point Selector/Zoom Button. This button also has 2 purposes. A) Auto Focus Point Selector: you can choose from a number of points as to which you would like to use. If you auto select, the camera will automatically select the best focal point for the shot. B) When reviewing your images on the screen, this will zoom out of a specific area.
  • Aperture/Exposure Compensation Button. This is another button that has 2 functions. A) Aperture Selector: to set the aperture, hold down this button and turn the dial to the preferred aperture. B) Exposure Compensation: used to alter the standard exposure set by the camera. You can make the image brighter or darker with this function, and it can be used in any creative shooting mode (but cannot be used when shooting in manual). This setting does not automatically cancel when you turn your camera off, so you must manually reset it to zero when you’re done taking photos.
  • White Balance Selection, and Print/Share Button. This particular button has three functions. White balance is for making the white areas of your image look white. Normally, the auto white balance setting will obtain the correct white balance. However, if you want more control over this function, you can use this button to change the setting. You can also print and share with this button (see your manual for instructions).
  • Metering Mode/Jump Selection Button. The metering mode is the method of measuring the brightness of the subject. If you aren’t sure which metering method to use, select evaluative metering. Using this same button, you can also browse through your photos 10 or 100 images at a time using the jump selection button.
  • AF Mode Selection Button. Use this button to change the AF mode to suit different subjects. One-Shot AF  is great for still subjects. Al Focus AF is great if you aren’t sure which AF mode to choose. Your camera will typically decide depending on your subject’s movement. Al Servo AF is perfect for moving subjects such as your children.
  • Set. By setting various optional settings with the menus, you’ll use the menu button, cross keys and set button to select your preferences.
  • Erase Button. This button will erase any selected images. You are normally asked first “are you sure” as a safeguard.
  • Picture Style Selection Button. This button gives you the ability to obtain the desired image effects for your subject matter. You can choose between Standard, Portrait, Landscape, Neutral, Faithful and Monochrome (for black and white images). If you’re not sure, stick with standard.
  • Playback Button. When the camera is turned on, this will display the last image taken on the small screen. Then you can scroll through all the others by using the cross keys.
  • Drive Mode Selection Button. Push this button if you want to use your self-timer, a remote control or you want to use continuous shooting mode (which is great for capturing multiple shots of your children with the hopes that one of them is perfect).
  • LCD Screen.  Displays menus and images that have been exposed. It will not display the image on screen like most digital compact point and shoot cameras.
  • Menu Button. The menu gives you access to all internal menu functions on your LCD screen. You scroll through them using the cross keys (or dial if you have one) and select buttons. See your camera’s manual for camera specific functions.
  • Shooting Setting Display.  Press this button to see all settings information for the selected image (exposure, white balance, date/time, image size, flash details, etc).
Nikon Camera
  • What does this button do? A quick guide to understanding your camera’s controls 
  • Nomad_Soul/Shutterstock
  • Buying a camera with an interchangeable lens is an exciting experience, but it can also be overwhelming. Whether DSLR or mirrorless, these cameras offer superior image sensors and a bevy of features and adjustable settings. Even entry-level models have a confusing number of buttons and controls. Choosing a camera like this is not just about resolution, dynamic range, or other objective metrics of image quality, but about being able to achieve a specific effect or creative vision.
  • Learning the layout of one camera — in this case, a Nikon D5600 with a retractable kit lens — will help you better understand other models, as well.
  • THE TOP OF THE CAMERA
  • The top of the camera is usually where you’ll find the most commonly-used controls. Some cameras are chock-full of buttons and dials on top, but the D5600 keeps it as simple as possible with just the essentials.
  • Video start-stop button — Don’t press the red button! Unless you want to shoot video, that is. This button may show up in a different position on your camera, but it is likely still decorated with a red dot. Some cameras forgo a separate record button and instead use the regular shutter button, along with a movie mode on the mode dial, for shooting videos.
  • Power switch — This turns the camera on and off. Nikon power switches typically encircle the shutter release button, but many other brands will put this switch elsewhere on the body.
  • Shutter release button — Press this button to take a picture! It’s almost always located in the same position on all interchangeable lens cameras.
  • Exposure compensation-aperture button — Most entry-level DSLRs make do with a single command dial which, by default, will control the shutter speed when in manual mode. If you want to control aperture, you need to hold down this button. If not in manual mode, this button allows you to adjust exposure compensation — that is, make the image brighter or darker while still letting the camera make its own decisions about which settings to use to achieve that.
  • Mode dial — This sets the camera to your desired shooting mode. The standard modes are Program, Shutter Priority, Aperture Priority, and Manual (denoted by the P, S, A, and M positions on the dial). Most cameras, especially entry-level models, will also have a “green box” automatic mode, which is basically fool-proof and will even raise the pop-up flash automatically when needed. A no-flash automatic mode — located directly below full automatic, at least in our example — keeps all settings in automatic, but will disable the pop-up flash when you don’t want to use it. Scene modes contain automated presets for capturing landscapes, portraits, and sports, while Effects modes usually offer different digital enhancements, like selective color.
  • Live view switch — Some cameras have a switch, others a button, but this locks the mirror in a DSLR, blocking the optical viewfinder and allowing you to preview your image directly on the LCD screen. This has limited use for still photography, but you must be in live view to shoot video. Mirrorless cameras are always in live view, so they won’t have this switch. However, if you have a mirrorless camera with an electronic viewfinder, you will have a button to change from the viewfinder to the rear screen.
  • Command dial — This lets you adjust shutter speed and, when the exposure compensation-aperture button is held, aperture. Most cameras also make use of the command dial for navigating menus or controlling other context-sensitive functions (like ISO or white balance). While the D5600 and other entry-level models have a single command dial, higher-end cameras often have two or even three, allowing for shutter speed, aperture, and sometimes ISO to be adjusted on dedicated dials.
  • LENS AND SIDE OF THE CAMERA
  • Generally, buttons placed on the side of your camera won’t be for commonly-used functions. There are some interesting controls on the D5600, however, that make it worth investigating.
  • Flash button — In any of the “advanced” exposure modes (P, S, A, or M), this button will trigger the pop-up flash. Its location may vary from camera to camera, but the “lightning bolt” symbol is universal, so you’ll always be able to find it. The icon next to it is the flash symbol, plus the exposure compensation symbol. Holding this button will let you adjust flash exposure compensation, allowing you to adjust how bright you want the flash to be.
  • Function button — Some cameras have a slew of these. Function buttons are useful because they can be programmed to do whatever you want. If there’s a feature of your camera that’s buried in the menu but you’d like to be more accessible, chances are you can assign it to a function button.
  • Zoom ring — Usually the larger of the lens rings, turning the zoom ring zooms the lens in or out.
  • Focus ring — The smaller of the lens rings, rotating this ring allows you to adjust focus — but only when autofocus is turned off. On an entry-level lens like this one, you’ll notice the focus ring is particularly small. Lenses oriented toward professionals will often have larger focus rings owing to the fact that experienced users are more likely to use manual focus than beginners.
  • Lens retract button — Retractable lenses are becoming increasingly popular as they are more compact than non-retractable models. You must press this button to initially “zoom” the lens into its operational position, and again to retract it when you’re done shooting.
  • Lens release button — Press this button to unlock the lens mount and detach the lens by rotating it. You don’t need to press it when mounting a lens.
  • Drive mode button — This lets you control the camera’s drive mode, allowing you to take a single shot, shoot continuously, or use a countdown timer. This button is in a pretty unique position in our example, but most manufacturers will place it on the back or top of the camera. Nikon’s designers, however, likely needed to make use of that negative space, so they put it here. Like the flash symbol, the icons used for continuous drive and the timer are universal, so you’ll be able to easily identify these on other cameras. Keep in mind that many cameras won’t have a dedicated button for these features, however, meaning they will live within the menu somewhere.
THE BACK OF THE CAMERA
  • Well, this looks like a mess! But don’t worry, most of the controls here are pretty self-explanatory. Much of what you’ll find on the back of a camera is related to menu navigation and playback, although a few of these buttons are useful during shooting, too.
  • Menu button — Like you may have guessed, this brings up the camera’s menu, where you can change image quality, autofocus settings, and everything else about your camera. Note: If you’re in “green box” auto mode, some menu options may be unavailable.
  • Diopter adjustment — On cameras with viewfinders, the diopter adjustment lets you focus the viewfinder. If everything looks out of focus when you hold the camera to your eye, even when autofocus is turned on, the problem may lie with the diopter. So before you return your lens for a refund, play around with this adjustment. Mis-focused diopters are a common source of frustration for first-time DSLR buyers, but, fortunately, the fix is often very simple.
  • Info button — While shooting, pressing this button will cycle through the camera’s various information displays. During image playback, it can display metadata, a histogram, and other pertinent information about the photo at hand.
  • Autofocus-autoexposure lock — When using autofocus and autoexposure, holding this button down will lock those settings, even if you move the camera. This isn’t often used by beginners, but it is beneficial for more advanced shooters who can use it to take several shots with different framings while ensuring all remain focused on the same point and exposed identically.
  • Image playback button — Press this button to review images (and videos) on the LCD screen. Pretty simple, no?
  • button — Nikon really does call this the “i” button — probably because it already has an “info” button on its cameras. Many other brands have a similar button, usually denoted by a “Q,” for “quick menu.” Pressing this button brings up a set of functions on the camera’s LCD screen, which can be controlled directly. This can be useful for adjusting ISO, white balance, and drive mode settings on cameras that don’t have dedicated buttons or dials for said features.
  • OK button — This is used primarily for selecting menu items, but on some cameras, it will also center the active focus point when using single-point autofocus.
  • Multi selector — Although this may be known by a different name on other brands, most cameras incorporate some sort of four-way controller like this. Beyond using it for navigation, many manufacturers will map shooting functions to each direction. This can also be used to move the active focus point in single-point AF mode, although some cameras will have a separate, dedicated control for this.
  • Magnify button — We took the liberty of labeling this as “magnify” rather than “zoom” in order to avoid confusion, as this button has nothing to do with zooming the lens. This is for magnifying an image during playback, allowing you to see greater detail, which is often useful for ensuring the camera focused where you wanted it to. Some cameras even let you use this button to magnify a live-view image.
  • Delete button — Denoted by a universal trash can icon, pressing this button will let you delete a photo from your memory card during playback. Every manufacturer does it a bit differently, but it won’t ever be a one-touch process. You will have to press the button twice, or another button — like the OK button — afterward to confirm your decision.
  • Demagnify button — Again, we’re not calling this “zoom out.” This is the opposite of the aforementioned magnify button, but will also let you expand the playback view to show multiple image thumbnails at once. Some cameras will even let you pull back into folder or calendar views. This can be useful for quickly navigating through large image libraries, as modern memory cards can hold thousands of images. You’ll also notice that Nikon has a “?” next to the magnifying glass symbol. This button performs double duty as the help button; you can press it to see tips regarding a particular menu function.
And there you have it! Hopefully this overview has given you a clearer understanding of how the controls work on a modern camera with an interchangeable lens. These cameras often appear complex, but over time, all of this complexity fades away as you become more comfortable with the controls. There’s a good chance that many of these buttons will be used sparingly, too. As long as you know where the mode dial, command dial, and shutter release are located, you’re well on your way to mastering your camera.


MMC 106 Introduction to Visual Language: Photography & Videography


Unit 1: Basic Aspects of Visual Culture

Painting:

John Berger’s Ways of Seeing – Selected Reading 
Perspective and Renaissance Painting 
Impressionism
Avant Garde Art- Surrealism, Dadaism and Cubism 
Graphiti as Art and Resistance

Photography:

Development of Photography
Genres of Photography
– Candid, Glamour, Wildlife, Sport and War 
Analogue and Digital
Aesthetics of Photography
– Composition, light, frame, color and monochrome effects
Study of Photographers and their work – Henri Cartier-Bresson and Raghu Rai 

(Ansel Adams, Robert Capa, Robert Doisneau, Robert Frank, Elliott Erwitt, Dorothea Lange,  Richard Avedon, Diane Arbus, Brassaï,  André Kertész, Steve McCurry, Annie Leibovitz, Vivian Maier, Eugène Atget, Sebastião Salgado, Man Ray, Garry Winogrand, Martine Franck (Cartier's Spouse), Helmut Newton, William Klein, Irving Penn, Walker Evans, William Eggleston, W. Eugene Smith)
Unit 2: Optics & Chemistry of photography

Image formation, view finder cameras, twin lens cameras, single lens cameras Types of lenses
Aperture, exposure time, film speed, exposure meters
Image formation in available light, Lighting, Image formation in artificial light Developing, printing and enlargement of photographs
Dark room techniques, chemicals used in developing and printing

Unit 3: Digital photography and photo editing

Digital image formation, auto mode Vs. manual mode, comparasion of digital and analogue techniques, capturing motion, photo editing using Photo Shop

Unit 4: The Video Camera

Types of video cameras
What's SD, HD, Full HD, Ultra HD?


Suggested projects: Analysing camera and lighting pattern in a chosen film; analysing a chosen photographer’s work; a project based on family portraits or family albums


MMC 107 Still Photography & Videography Lab


EXPOSURE METER  / LIGHT METER

Almost every camera on today's market has a light meter inside. It's that thing on the bottom that has the ‘plus’ on right hand side & the minus on the left and then a spot right in the middle, that's theoretically the proper exposure. 

If you see that your light meter is all the way to the ‘plus’ side that means your photo is going to be over exposed. What does overexposed mean well it means you're letting too much light in and that your image is going to be too bright.

Now conversely on the other side if you go all the way to the minus think about it it means that your image is going to be under exposed and when it's underexposed it means you're not letting enough light in

If it's right in the middle technically that's saying that that is the proper exposure now keep in mind it's a good starting point what's happening with your light meter is that it's taking the brightest scene the brightest part of the scene and the darkest part of the scene and giving you

the average which is technically right in the middle of the light meter.

Now you can make tweaks here or there to make sure that you have the right exposure but this is a basic way to get your right exposure is to line it up right in the middle so as you can see the light meter is something that you should take a look at.

In AUTO mode, your light meter can be controlled by the exposure triangle as you change your shutter speed or your aperture or your ISO, the light meter is going to be affected by that.


Exposure


Dark / underexposed

f/3.2
1/2000
1600 ISO

Let more light by slow shutter

f/3.2
1/500 or 1/250
1600 ISO


–Introduction to Camera Basics

Introduction
Overview the cameras 


–Using the Camera

Powering Camera  
Storage
Turning on the Camera
LCD Screen
LCD features
Viewfinder
Recording
Lens
Lens hood
Exposure
Filters
Focus
Zooming
Audio
Framing a shot
Transfering Footage 

–stabilising the camera

Tripod
Handheld 


What Are the Video Systems?


There are many video systems, but we will cover the most common ones:


DISPLAY RESOLUTION Televisions